Apptoto Appointments
Table of Contents
- User Interface
- Create Appointment
- Edit Appointment
- How to Add an Appointment to a Signup Page
- Show/Hide Calendars
- Change the Date
- Import Appointments from File
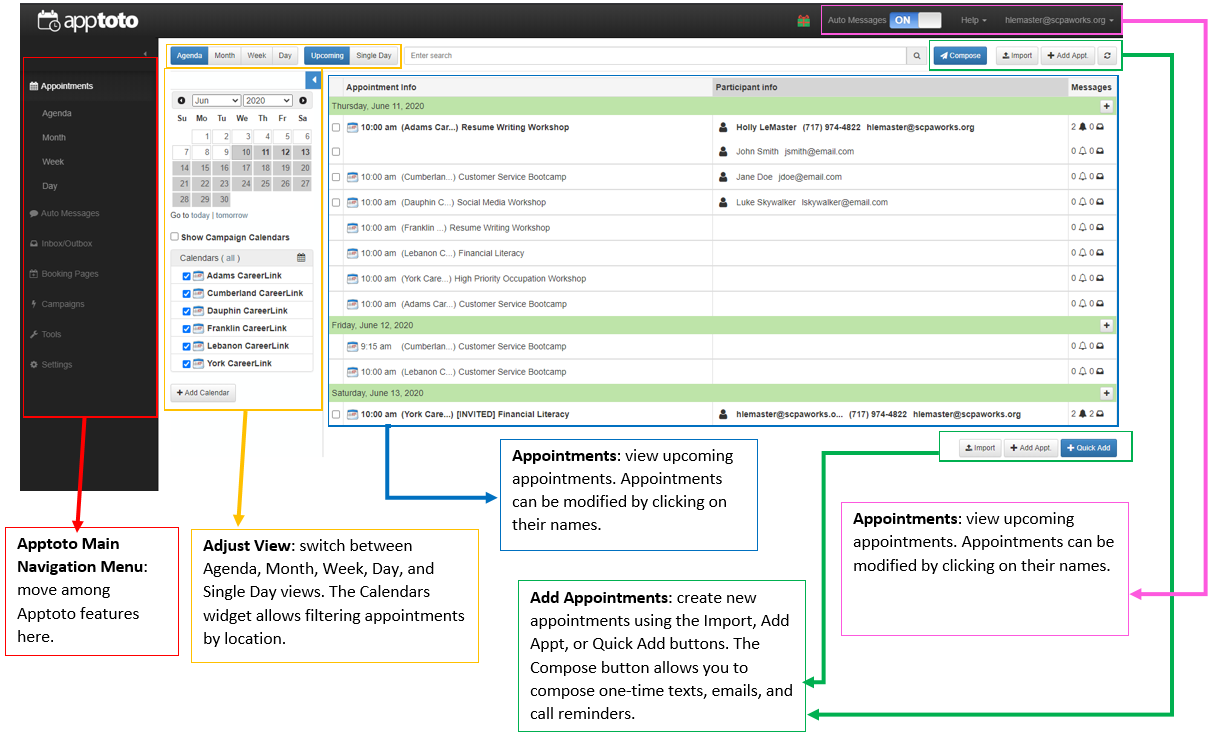
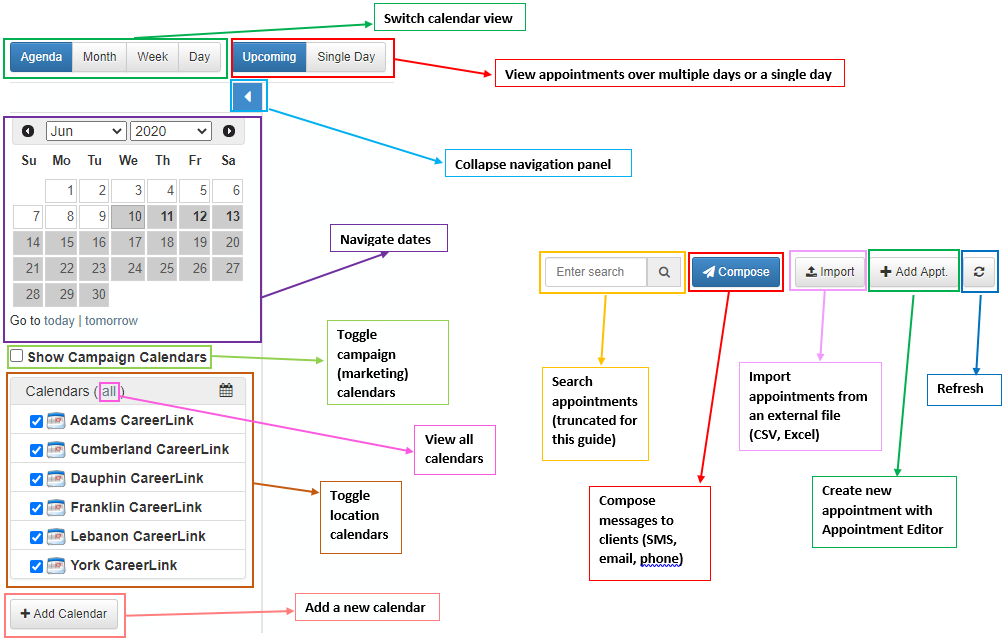
User Interface
Below is the interface for managing appointments in Apptoto.
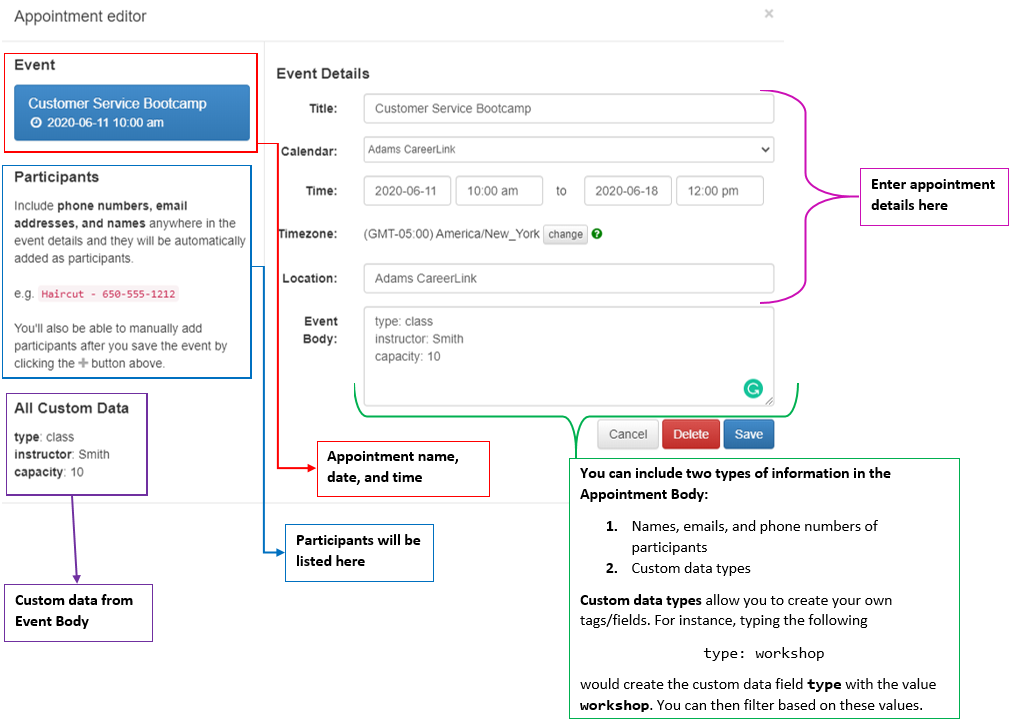
How to Create an Appointment
-
Click the Add Appt. button.
-
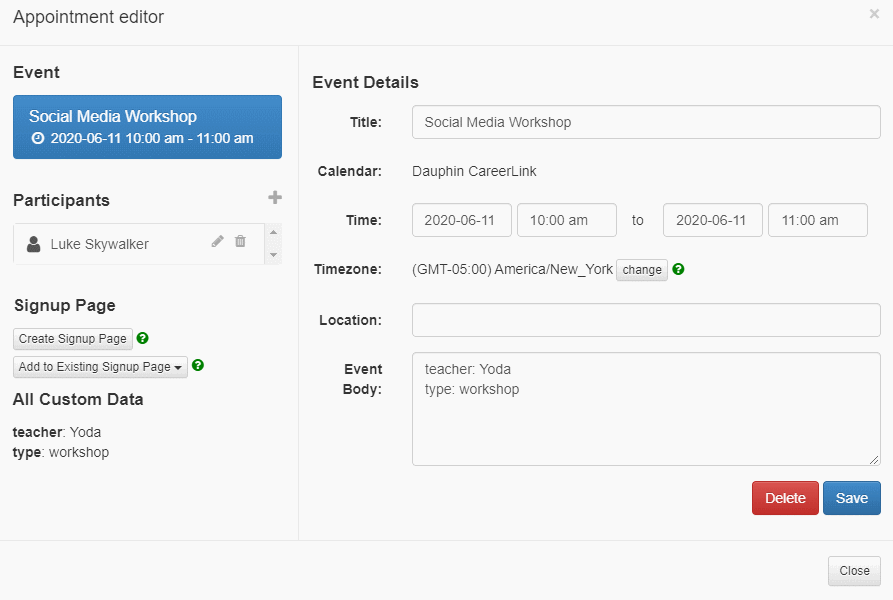
In the Appointment Editor, enter the information for your appointment.
-
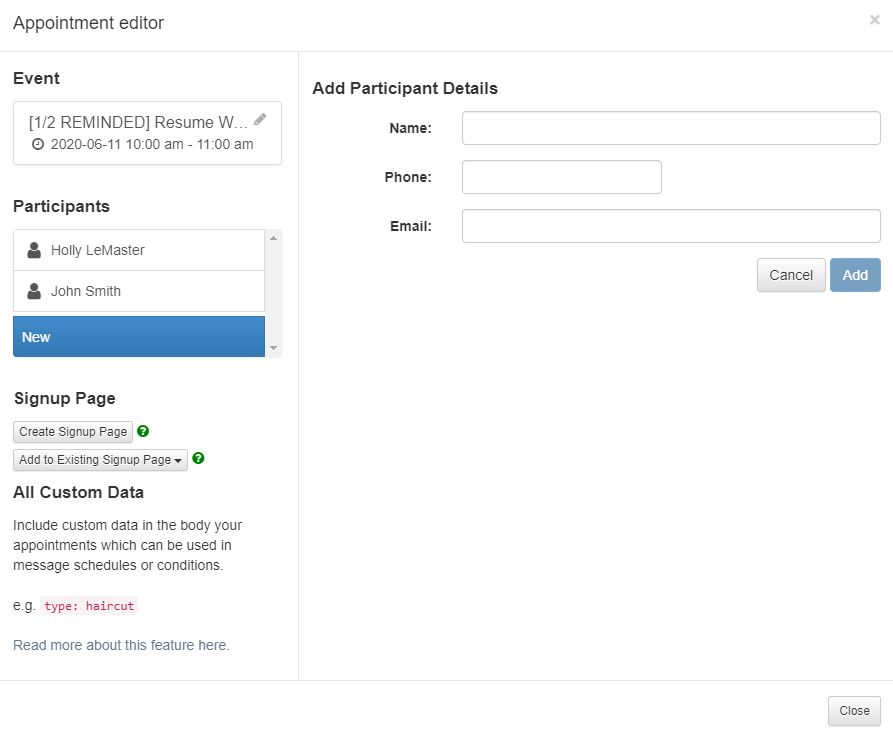
Click Save to save the appointment details. You will be prompted to enter participants.
-
Enter any participants you want to add to the event.
-
If you’d like to add the event to a Signup Page:
- In the Appointment Editor’s right-hand sidebar, click Add to Existing Signup Page.
- Select the Signup Page that corresponds to your event’s location.
-
Review the event information, and hit close to finish editing.
How to Edit an Appointment
- Click on the name of the appointment.
- Edit the contents of the appointment in the Appointment Editor.
- Click Save to save your changes, and Close to close out the edit dialog.
How to Add an Appointment to a Signup Page
- Create the appointment, or select an existing appointment for editing. Do not close the Appointment Editor.
- Under the Signup Page heading in the left column of the Appointment Editor, click Add to Existing Signup page.
- In the dropdown menu, select the signup page that corresponds to the event’s location. There is a signup page for each CareerLink location in our region.
- The appointment will be added to the signup page. Participants can now go to the page’s link and sign up for available appointments.
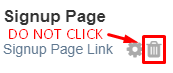
- To preview your signup page, click the Signup Page Link that appears after you add an event to a signup page.
- You must click Save to finalize adding the appointment to the signup page.
IMPORTANT: Do NOT click the delete icon next to the Signup Page Link if you select the wrong signup page. This will delete the signup page entirely!
Show/Hide Calendars
- Click the name of the calendar corresponding to the location you’d like to select.
- All other calendars will be hidden from your view.
- To disable filtering, click the all link next to the Calendars label.

Change the Date
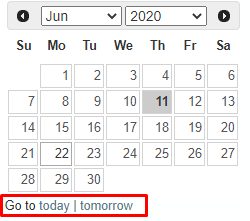
- Using the calendar navigation controls on the left side of the Appointments page, select the date you’d like to view.
- You can quickly view the current or next day’s date by clicking the Go to today | tomorrow button below the calendar controls.
Import Appointments from File
You can bulk import appointments from a CSV or XML file. CSV (comma-separated values) files can be created from Excel spreadsheets.
Suggested CSV Layout
| Appointment type | Full name | Date | Start Time | End Time | Phone | |
|---|---|---|---|---|---|---|
| Customer Service Bootcamp | Luke Skywalker | 6/12/2020 | 9:00AM | 10:00AM | 123-555-6789 | lskywalker@email.com |
| Resume Writing Workshop | Leia Organa | 6/12/2020 | 11:00AM | 12:00PM | 717-555-1234 | lorgana@email.com |
| Social Media Workshop | Han Solo | 6/12/2020 | 2:00PM | 3:00PM | 333-555-7777 | hsolo@email.com |
Uploading Procedure
-
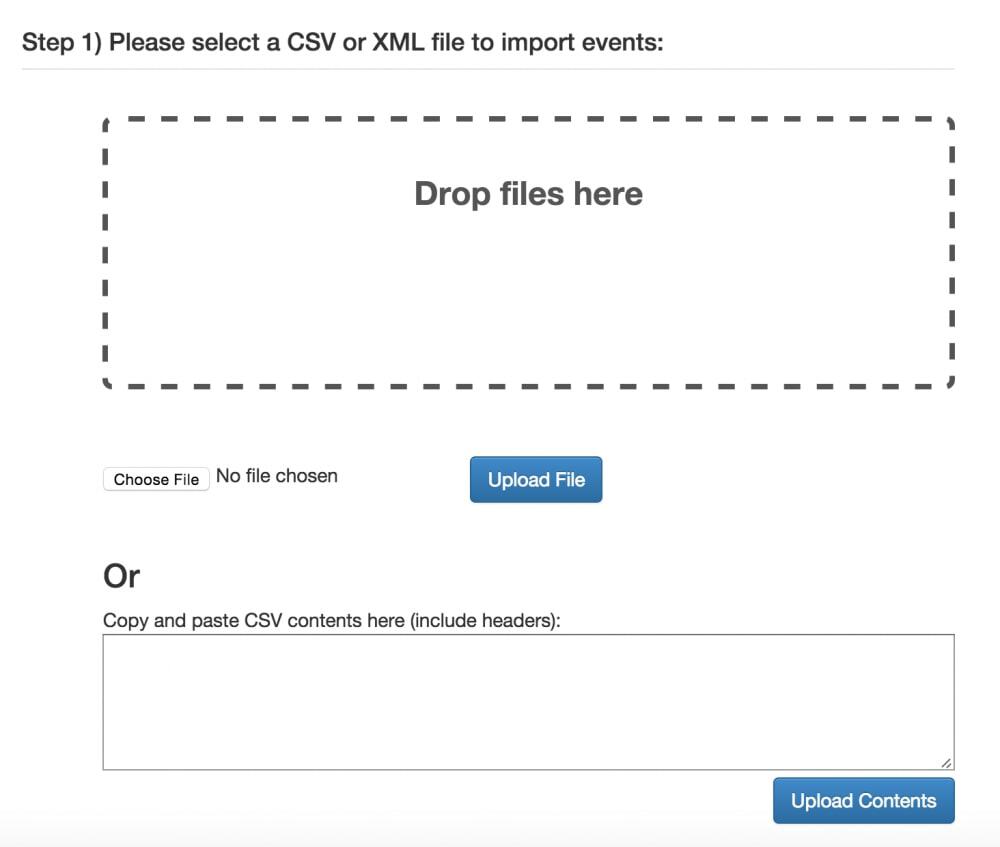
Click on the Import button at the top-right of the page.
-
You can drag and drop the CSV file into the file dropbox, or select Choose File to select the file from Windows Explorer.
- Alternatively, you can copy and paste the contents of your CSV file into the text box below the upload.
-
If you uploaded a file, click Upload File to submit your file for processing. If you pasted the contents of your CSV file, click Upload Contents instead.
-
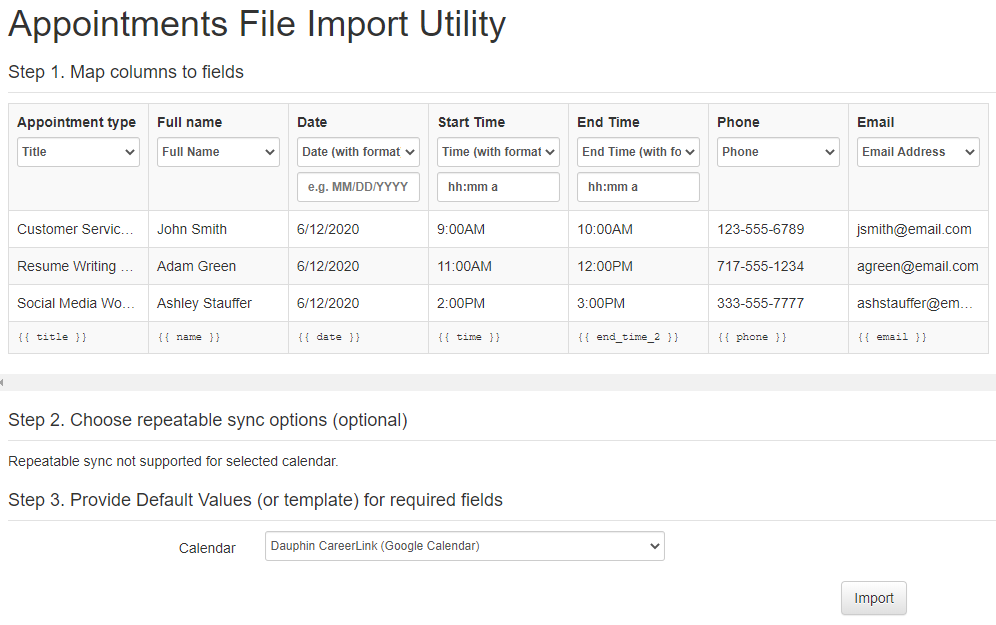
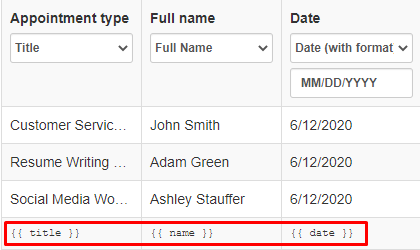
Once Apptoto has accepted your file, you will be prompted to map CSV columns to Apptoto fields. For each column in your CSV, use the dropdown box to select the matching Apptoto field.
- i.e. for the Full Name column in your CSV, you would select Full Name in the dropdown.
-
(Optional) You may be prompted to set “repeatable sync options.” If these appear, it is recommended that you use the following options:
- Avoid duplicating appointments: ON
- Update existing appointments if found: ON
- Delete appointments if they were removed: OFF
-
Under the Step 3. Provide Default Values (or template) for required fields, make sure you have the correct calendar selected. The selected calendar should correspond with the location of the appointments.
-
(Optional) You may be prompted to create unique appointment identifiers for your import. This happens when the CSV contains insufficient information for Apptoto to index it automatically.
-
Take a look at the table under the Step 1. Map columns to fields heading. The bottom row shows the field names of each column.
-
You must enter a combination of these fields in the Unique Appt Id field under Step 3 of the importing process. Here is a suggested format:
{{ title }} - {{ name }} - {{ date }} - {{ time }}
-
-
Click Import to begin importing your appointment data!
-
You will see the following screen if the import has completed successfully. If the upload does not succeed, you will see an error message. Read the message to determine the issue, fix it, and then restart the upload process to try again. Alternatively, if only some rows have issues, you can choose to skip uploading just those rows.
-
Should you need to, you have the option to undo a successful import by clicking Undo Import.
